
Netty自己的ByteBuf
ByteBuf是為了解決ByteBuffer的問題和滿足網絡應用程序開發人員的日常需求而設計的.
JDK中ByteBuffer的缺點:
- 無法動態擴容 長度是固定的,不能動態擴展和收縮,當數據大于ByteBuffer容量時,會發生索引越界異常.
- API使用復雜 讀寫的時候需要手動調用flip()和rewind()等方法,使用時需要非常謹慎的使用這些api,否則容易出現錯誤.
ByteBuf做了哪些增強?
- API操作便捷性
- 動態擴容
- 多種ByteBuf實現
- 內存復用機制
- 零拷貝機制
ByteBuf的操作
三個重要屬性:
- capacity容量
- readerIndex讀取位置
- writerIndex寫入位置
提供了兩個指針變量來支持順序讀和寫操作,分別是readerIndex和writeInDex,也就把緩沖區分成了三個部分:
0[ --已讀可丟棄區域-- ]reaerIndex[ --可讀區域-- ]writerIndex[ --待寫區域-- ]capacity
常用方法定義:
- 隨機訪問索引getByte
- 順序讀read*
- 順序寫write*
- 清除已讀內容discardReadBytes
- 清除緩沖區clear
- 搜索操作
- 標記和重置
- 引用計數和釋放
我們可以對這些api做一些測試,如下:
package io.netty.example.echo;

import JAVA.util.Arrays;
import io.netty.buffer.ByteBuf;
import io.netty.buffer.Unpooled;

/**
 * @author daniel
 * @version 1.0.0
 * @date 2021/12/20
 */
public class ApiTest {

    public static void main(String[] args) {
        //1.創建一個非池化的ByteBuf,大小為10字節
        ByteBuf buf = Unpooled.buffer(10);
        System.out.println("原始ByteBuf為:" + buf.toString());
        System.out.println("1.ByteBuf中的內容為:" + Arrays.toString(buf.array()));
        System.out.println();

        //2.寫入一段內容
        byte[] bytes = {1,2,3,4,5};
        buf.writeBytes(bytes);
        System.out.println("寫入的bytes為:" + Arrays.toString(bytes));
        System.out.println("寫入一段內容后ByteBuf為:" + buf);
        System.out.println("2.ByteBuf中的內容為:" + Arrays.toString(buf.array()));
        System.out.println();

        //3.讀取一段內容
        byte b1 = buf.readByte();
        byte b2 = buf.readByte();
        System.out.println("讀取的bytes為:" + Arrays.toString(new byte[]{b1, b2}));
        System.out.println("讀取一段內容后ByteBuf為:" + buf);
        System.out.println("3.ByteBuf中的內容為:" + Arrays.toString(buf.array()));
        System.out.println();

        //4.將讀取的內容丟棄
        buf.discardReadBytes();
        System.out.println("丟棄已讀取的內容后ByteBuf為:" + buf);
        System.out.println("4.ByteBuf中的內容為:" + Arrays.toString(buf.array()));
        System.out.println();

        //5.清空讀寫指針
        buf.clear();
        System.out.println("清空讀寫指針后ByteBuf為:" + buf);
        System.out.println("5.ByteBuf中的內容為:" + Arrays.toString(buf.array()));
        System.out.println();

        //6.再次寫入一段內容,比第一段內容少
        byte[] bytes2 = {1,2,3};
        buf.writeBytes(bytes2);
        System.out.println("再寫入的bytes2為:" + Arrays.toString(bytes2));
        System.out.println("再寫入一段內容后ByteBuf為:" + buf);
        System.out.println("6.ByteBuf中的內容為:" + Arrays.toString(buf.array()));
        System.out.println();

        //7.將ByteBuf清空
        buf.setZero(0, buf.capacity());
        System.out.println("內容清空后ByteBuf為:" + buf);
        System.out.println("7.ByteBuf中的內容為:" + Arrays.toString(buf.array()));
        System.out.println();

        //8.再次寫入一段超過容量的內容
        byte[] bytes3 = {1,2,3,4,5,6,7,8,9,10,11};
        buf.writeBytes(bytes3);
        System.out.println("寫入超量的bytes3為:" + Arrays.toString(bytes3));
        System.out.println("寫入超量內容后ByteBuf為:" + buf);
        System.out.println("8.ByteBuf中的內容為:" + Arrays.toString(buf.array()));
        System.out.println();
    }
}
從這些api的使用中就可以體會到ByteBuf比ByteBuffer的強大之處,我們可以深入研究一下它在寫入超量數據時的擴容機制,也就是buf.writeBytes(byte[])方法
ByteBuf動態擴容
容量默認值為256字節,最大值為Integer.MAX_VALUE,也就是2GB
實際調用
AbstractByteBuf.writeBytes,如下:
AbstractByteBuf.writeBytes
@Override
public ByteBuf writeBytes(byte[] src) {
    writeBytes(src, 0, src.length);
    return this;
}
AbstractByteBuf.writeBytes(src, 0, src.length);
@Override
public ByteBuf writeBytes(byte[] src, int srcIndex, int length) {
    ensureWritable(length); //檢查是否有足夠的可寫空間,是否需要擴容
    setBytes(writerIndex, src, srcIndex, length);
    writerIndex += length;
    return this;
}
AbstractByteBuf.ensureWritable(length);
@Override
public ByteBuf ensureWritable(int minWritableBytes) {
    ensureWritable0(checkPositiveOrZero(minWritableBytes, "minWritableBytes"));
    return this;
}
AbstractByteBuf.ensureWritable0(checkPositiveOrZero(minWritableBytes, "minWritableBytes"));
final void ensureWritable0(int minWritableBytes) {
    final int writerIndex = writerIndex(); //獲取當前寫下標
    final int targetCapacity = writerIndex + minWritableBytes; //計算最少需要的容量
    // using non-short-circuit & to reduce branching - this is a hot path and targetCapacity should rarely overflow
    if (targetCapacity >= 0 & targetCapacity <= capacity()) { //判斷當前容量是否夠用
        ensureAccessible(); //檢查ByteBuf的引用計數,如果為0則不允許繼續操作
        return;
    }
    if (checkBounds && (targetCapacity < 0 || targetCapacity > maxCapacity)) { //判斷需要的容量是否是合法值,不合法為true直接拋出越界異常
        ensureAccessible();//檢查ByteBuf的引用計數,如果為0則不允許繼續操作
        throw new IndexOutOfBoundsException(String.format(
                "writerIndex(%d) + minWritableBytes(%d) exceeds maxCapacity(%d): %s",
                writerIndex, minWritableBytes, maxCapacity, this));
    }

    // Normalize the target capacity to the power of 2.(標準化為2的次冪)
    final int fastWritable = maxFastWritableBytes();
    int newCapacity = fastWritable >= minWritableBytes ? writerIndex + fastWritable
            : alloc().calculateNewCapacity(targetCapacity, maxCapacity); //計算擴容后容量(只要擴容最小64)

    // Adjust to the new capacity.
    capacity(newCapacity); //設置新的容量
}
alloc().calculateNewCapacity(targetCapacity, maxCapacity) -> AbstractByteBufAllocator
@Override
public int calculateNewCapacity(int minNewCapacity, int maxCapacity) {
    checkPositiveOrZero(minNewCapacity, "minNewCapacity"); //最小所需容量
    if (minNewCapacity > maxCapacity) { //判斷最小所需容量是否合法
        throw new IllegalArgumentException(String.format(
                "minNewCapacity: %d (expected: not greater than maxCapacity(%d)",
                minNewCapacity, maxCapacity));
    }
    final int threshold = CALCULATE_THRESHOLD; // 4 MiB page 閾值超過4M以其他方式計算

    if (minNewCapacity == threshold) { //等于4M直接返回4M
        return threshold;
    }

    // If over threshold, do not double but just increase by threshold.
    if (minNewCapacity > threshold) { //大于4M,不需要加倍,只需要擴大閾值即可
        int newCapacity = minNewCapacity / threshold * threshold;
        if (newCapacity > maxCapacity - threshold) {
            newCapacity = maxCapacity;
        } else {
            newCapacity += threshold;
        }
        return newCapacity;
    }

    // 64 <= newCapacity is a power of 2 <= threshold
    final int newCapacity = MathUtil.findNextPositivePowerOfTwo(Math.max(minNewCapacity, 64)); //計算不少于所需容量的最小的2次冪的值
    return Math.min(newCapacity, maxCapacity); //取容量所允許的最大值和計算的2次冪的最小值,當然在這兒就是newCapacity=64
}
總結一下就是最小所需容量是否等于閾值,如果是直接返回閾值此后直接擴大閾值,否則以64為最小2次冪為基礎每次擴大二倍直到閾值.
選擇合適的ByteBuf實現
netty針對ByteBuf提供了8中具體的實現方式,如下:
|
堆內/堆外 |
是否池化 |
訪問方式 |
具體實現類 |
備注 |
|
heap堆內 |
unpool |
safe |
UnpooledHeapByteBuf |
數組實現 |
|
heap堆內 |
unpool |
unsafe |
UnpooledUnsafeHeapByteBuf |
Unsafe類直接操作內存 |
|
heap堆內 |
pool |
safe |
PooledHeapByteBuf |
|
|
heap堆內 |
pool |
unsafe |
PooledUnsafeHeapByteBuf |
~ |
|
direct堆外 |
unpool |
safe |
UnpooledDirectByteBuf |
NIO DirectByteBuffer |
|
direct堆外 |
unpool |
unsafe |
UnpooleUnsafedDirectByteBuf |
~ |
|
direct堆外 |
pool |
safe |
PooledDirectByteBuf |
~ |
|
direct堆外 |
pool |
unsafe |
PooledUnsafeDirectByteBuf |
~ |
在使用時,都是通過ByteBufAllocator分配器進行申請,同時分配器具有內存管理的功能。
在這兒堆內和堆外沒有什么區別,對api的使用時一樣的,僅僅是通過Unpooled申請的不一樣.
那個safe和unsafe有什么區別呢?
以UnpooledHeapByteBuf和UnpooledUnsafeHeapByteBuf中的getByte(int index)方法為例進行分析
UnpooledHeapByteBuf
@Override
public byte getByte(int index) {
    ensureAccessible();
    return _getByte(index); //真正的獲取字節的方法
}

@Override
protected byte _getByte(int index) {
    return HeapByteBufUtil.getByte(array, index);  //通過HeapByteBufUtil工具類獲取數據
}
HeapByteBufUtil
static byte getByte(byte[] memory, int index) {
    return memory[index];
}
UnpooledHeapByteBuf從堆內數組中獲取數據,這是安全的
UnpooledUnsafeHeapByteBuf
 @Override
public byte getByte(int index) {
    checkIndex(index);
    return _getByte(index);
}

@Override
protected byte _getByte(int index) {
    return UnsafeByteBufUtil.getByte(array, index);
}
PlatformDependent0
static byte getByte(byte[] data, int index) {
    return UNSAFE.getByte(data, BYTE_ARRAY_BASE_OFFSET + index);
}
UnpooledUnsafeHeapByteBuf是通過UNSAFE來操作內存的
現在我們來研究一下Unsafe
Unsafe的實現
Unsafe意味著不安全的操作,但是更底層的操作會帶來性能提升和特殊功能,Netty中會盡力使用unsafe以提升系統性能
Java語言很重要的特性就是一次編譯到處運行,所以它針對底層的內存或者其他操作做了很多封裝,而unsafe提供了一系列我們操作底層的方法,可能會導致不兼容或不可知的異常.
比如:
- 返回一些低級的內存信息
- addressSize
- pageSize
- 提供用于操作對象及其字段的方法
- allocateInstance
- objectFieldOffset
- 提供用于操作類及其靜態字段的方法
- staticFieldOffset
- defineClass
- defineAnonymousClass
- ensureClassInitialized
- 低級的同步原語
- monitorEnter
- tryMonitorEnter
- monitorExit
- compareAndSwapInt
- putOrderedInt
- 直接訪問內存的方法 allocateMomery copyMemory freeMemory getAddress getInt putInt
- 操作數組
- arrayBaseoffset
- arrayIndexScale
既然這些東西都是jdk封裝好的,而是netty也是直接使用的,所以我們無論在使用safe還是unsafe的時候都是無感知的,我們無需關系底層的操作邏輯,因為api都是一樣的,只是實現不一樣
是否還有一個疑問,池化和非池化是什么意思?
池化和非池化
比如在使用Unpooled.buffer(10)申請一個緩存區的時候,默認非池化申請的一個緩沖區.
池化和非池化的區別主要是申請內存緩存空間以及緩存空間的使用上,體現為內存復用.
- 在申請內存緩存空間方面:
- pool:池化申請的時候會申請一個比當前所需內存空間更大的內存空間,這就好比一個快遞柜,為此netty提供了buf分配管理器專門用來處理這種事情,來創建或復用ByteBuf.
- unpool:非池化申請只會申請特定大小能夠使用的內存緩存空間,使用完之后立刻釋放,這就像直接把快遞放到你的手中,你所在的位置就是開辟的內存空間.
- 在緩存空間使用方面:
- pool:池化申請的內存空間有一定擴容容積,也就是這個快遞柜可以存放多個快遞,只需要找到對應的方格即可存放,同樣buf分配管理器來復用已經創建好的內存空間,在創建ByteBuf的時候已經開辟3中大小的內存塊 normal:16MN small:8KB tiny:512B
- unpool:毫無疑問,非池化的方式必然是每次都會再去開辟內存空間的.
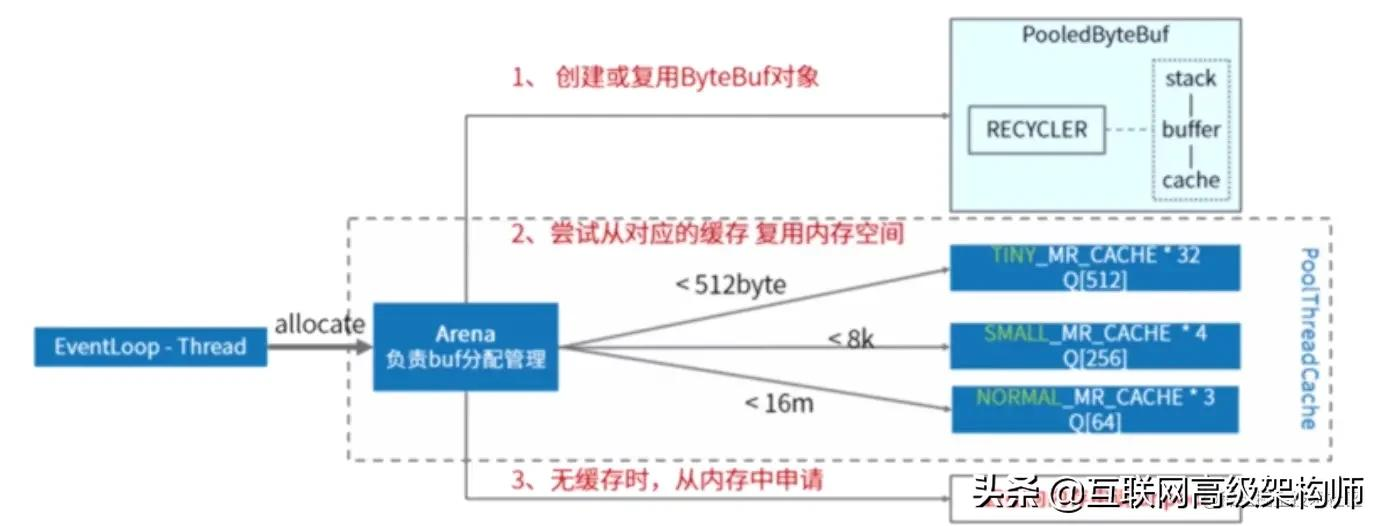
理論如此,netty中是如何做到內存復用的?
在netty中每一個EventLoopThread由PooledBytebufAllocator內存分配器實力維護了一個線程變量叫做PoolThreadCache,在這個變量中維護了3種規格的MemoryRegionCache數組用作內存緩存,MemoryRegionCache內部是鏈表,隊列里面存Chunk.
首先內存內存分配器會尋找合適的ByteBuf對象進行復用;
之后從內存數組中找到合適的內存空間進行復用;
PoolChunk里面維護了內存引用,內存復用的做法就是把ByteBuf的memory指向chunk的memory.
如果沒有找到對應的緩存空間,則直接向內存申請unpool的緩存空間.
netty中默認(池化)也是這樣做的,這也是netty性能高效的一個原因,但是就像example例子一樣,如果我們自己創建的話,netty推薦我們使用unpool.
==需要注意的是即使創建了可復用的ByteBuf,但是使用過后一直沒有被release,也就是沒有被回收也是不能被復用的,這是應用設計時應該注意的.==
說了半天的廢話,總算是要說到零拷貝機制了
零拷貝機制
Netty的零拷貝機制是一種應用層的表現,和底層JVM/操作系統內存機制并無過多關聯,你可認為netty就是一個軟件,我們在用這個軟件來創造另一個軟件.
- CompositeByteBuf,將多個ByteBuf合并為一個邏輯上的ByteBuf,避免了各個ByteBuf之間的拷貝 什么意思呢?這是一個虛擬的ByteBuf,這個ByteBuf并不是一個,而是一個復合緩沖區,有多個獨立的ByteBuf CompositeByteBuf compositeByteBuf = Unpooled.CompositeBuffer(); ByteBuf byteBuf = compositeByteBuf.addComponents(true,buffer1,buffer2); 復制代碼
- wrapedBuffer()方法,將byte[]數組包裝成ByteBuf對象 什么意思呢?這也是一個虛擬的ByteBuf,這個新創建的ByteBuf只是通過memory對此字節數組做了一個引用,避免了復制帶來的性能損耗. ByteBuf byteBuf = Unpooled.wrAppedBuffer(new byte[]{1,2,3,4,5}); 復制代碼
- slice()方法,將一個ByteBuf對象切分成多個ByteBuf對象 什么意思呢?這還是一個虛擬的ByteBuf,只不過拆分出去的ByteBuf中的memory引用的只是拆分出去的字節位置,并且會以unwarp保留一個對原ByteBuf的引用. ByteBuf byteBuf = Unpooled.wrappedBuffer("hello".getBytes()); ByteBuf newByteBuf = byteBuf.slice(1,2); 復制代碼
ByteBuf的零拷貝機制也是Netty高性能的一個原因.
作者:梧桐小站
鏈接:
https://juejin.cn/post/7049754668653608997
來源:稀土掘金


